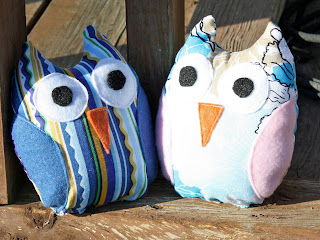
I made these stuffed owls make for a fun sewing project, I made both of them in less than 2 hours, and that included, making it up on the fly, taking photos, and a phone call! They stand about 6" tall.
Materials:
Basic sewing supplies
1 fat quarter of quilting style cotton (you will probably be able to get 3 owls out of 1 fat quarter)
Small squares of felt in black, white, orange, and color desired for wings. (Fleece also works for the wings, you just want something that won't fray.)
Fabric Glue
Fray Check
Polyester Fiber Fill (or desired stuffing)
Scrap fabric & dry beans (optional)
Owl Template: I used this template and did some edtiting on my computer to come up with these that I used: 1 & 2.
Steps:
 1. Cut out your pieces: 2 bodies, 1 beak, 2 puplis (black), 2 eyes (white), 2 wings (make sure to labels thes right and left).
2. Use your fabric glue to glue the pupils to the eyes.

3. Use a small dot of glue to secure eyes, beak, and wings to the body. Use only a small amount of glue for these parts since you will also sew these pieces, the glue is only to help keep them in place for sewing. Allow glue to dry for a few minutes.
 4. Stitch very close to the edge with matching thread around the eyes, beak, and outside of the wings. You will notice that I used white thread on this beak, I will be getting orange thread the next time I go to the fabric store!
5. Pin owl bodies together, right sides together. Fray Check both pieces around the bottom of the owl between the wings. Stitch with a 1/8" to 1/4" seam allowance leaving a 2" gap at the bottom of the owl between the wings for turning and stuffing. Make sure that your edges match up precisely.


6. Clip the points of the ears and the curve between ears, DO NOT clip through the seam!
7. Turn your owl right side out! At this point I ironed the bottom opening to make it easier to stitch closed.

8. Stuff your owl. Here you can use scrap fabric to make a little pouch to fill with dried beans to put in the bottom of your owl.
9. This is where you would create a simple pouch, fill with bdry beans, sew the pouch closed, and insert into the bottom of your owl.
10. Sew up the opening in your owl, this works best by hand. Use a ladder stitch. You're talking to a woman who hates sewing by hand, but this really does work better by hand.
Have fun!
If you love these owls but don't want to make your own I'm offering them for sale for $10. Shoot me an email or check out my shop for details: AnnabellesBasket@gmail.com http://www.facebook.com/AnnabellesBasket
*Use this tutorial however you like, all I ask is that you don't undermine my business by selling these owls in your own shop, thanks for understanding.


Cute!
ReplyDelete